
Using a Lorex Dynamic Domain Name System (DDNS service) account, you may access your Lorex security system from anywhere globally via an easy-to-remember free dynamic domain accessible 24/7. Lorex’s specialized free DDNS service solution will help you stay connected to the things that matter to you.
In general, you can set up Lorex DDNS with the steps below. But, before you start, take note of your Serial number, IP address, MAC address, Client port, and HTTP port.
- Go to your Lorex account and sign in. In the menu bar, select Warranties > Activate Warranty, fill the information, then click “Save Warranty.”
- Go to the menu bar and select DDNS > Set up a New DDNS, then choose your warranty.
- Fill in the requested data and select “Add Device.” You will receive an email confirmation.
- Log in to your Lorex recorder. Select Settings > Network.
- Fill in the details for your DDNS account found in the confirmation email sent.
If you want to know how to set up the DDNS on the Lorex security camera in more detail, read on.
Lorex DDNS Setup in 5 Easy Steps
You may apply this whether your IP address is static or dynamic. So, no matter how frequently your ISP changes your IP address, Lorex’s proprietary DDNS solution will keep you linked. (1)
Step #1: Create or Login Your Lorex Account
Go to your Lorex account and sign in. If you still don’t have one, then fill in the essential information and click Create an Account to register for an account.
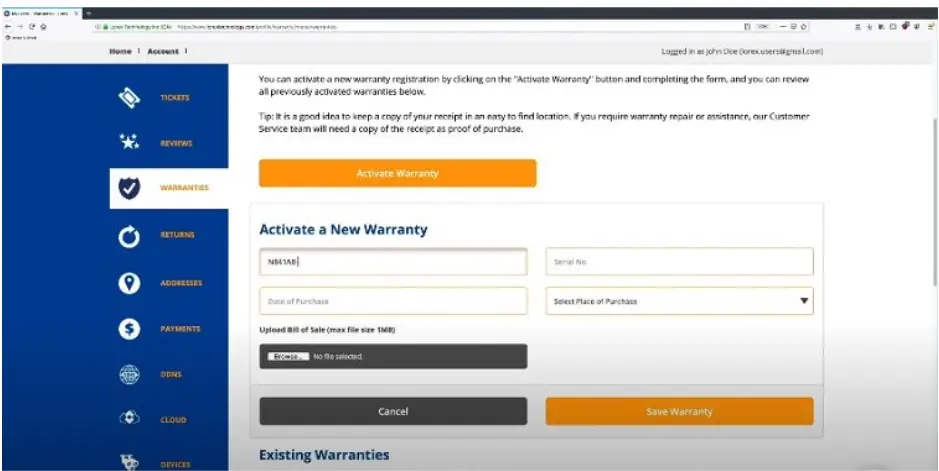
Step #2: Register Your Product Warranty
Please remember that you are required to register a warranty before performing DDNS registration.
- In the menu options, select “Warranties.”
- Click Activate Warranty.
- Fill out the warranty registration form with information about your device and where you bought it.
- Click “Save Warranty.”
You can find The Product Model Number and Serial Number in your product paperwork.
Step #3: New DDNS Setup
In the menu, select ‘DDNS.’ Hit “Set up a New DDNS,” then complete the Set up a New DDNS form with details about your device.
- Choose the product warranty you provided under Warranty.
- Set a name for your device under Device Name. You can use your real name, a business name, or anything else you like.
- Input the MAC address of your Lorex device under MAC Address. For more information, consult your product’s manual or quick start guide. A MAC address is a 12-digit address used to designate devices on a network.
- Provide the website address you will use to access the network remotely under URL inquiry. For example, if you put in tom smith, the web URL for your product will be http://tomsmith.lorexddns.net.
- Hit “Add device.” Then, you will receive a confirmation email.
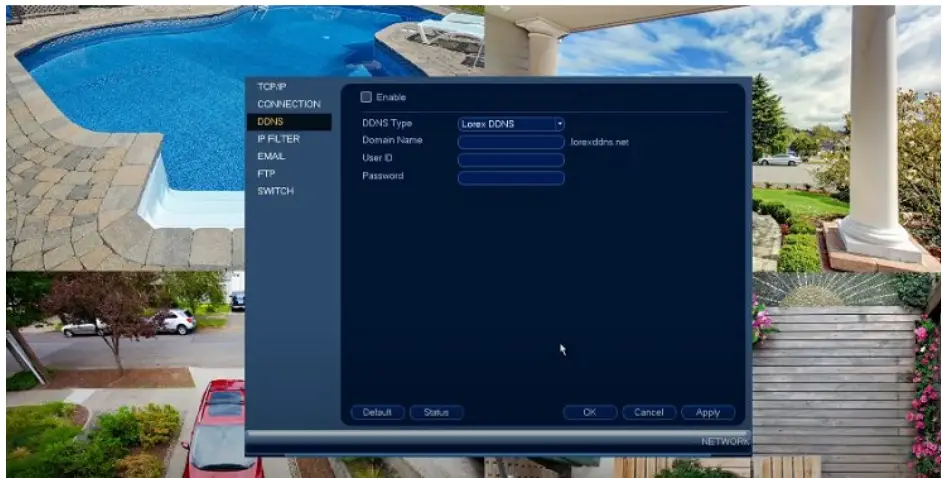
Step #4: Register The DDNS Account Information To Your Device
Sign in to your Lorex recorder and select the settings icon. From the pop-up menu, select Network.
To enable DDNS, enter the DDNS account details received in the Lorex DDNS confirmation email. Save your network settings and click Apply.
Step #5: Complete Port Forwarding
The last step is to set up your router’s port forwarding. You should forward your device’s HTTP port and include the client port to your device’s IP address. (2)
You can check your router’s manual or contact Lorex technical assistance for more information.
Then, in your web browser, type in your personalized URL. Enter your username and password.
You may now access your Lorex device from anywhere and view its stream.
We’ve also listed some other Lorex learning guides below. Bookmark them for later reading. Until our next article!
References
(1) static or dynamic IP address – https://www.avast.com/c-static-vs-dynamic-ip-addresses
(2) HTTP – https://www.britannica.com/technology/HTTP
Video Reference